Sewing Educational Warehouse is pleased to offer free sewing machine service information covering timing and tension adjustments for some of the most common sewing machines.
We carry many service guides which include the factory service manual. Our sewing machine service manual page has a complete list.
Any material presented on this site, downloaded or in print form is intended for information purposes only. Any adjusting you do to your own sewing equipment is at your own risk.
Machine makes listed below are in alphabetic order.
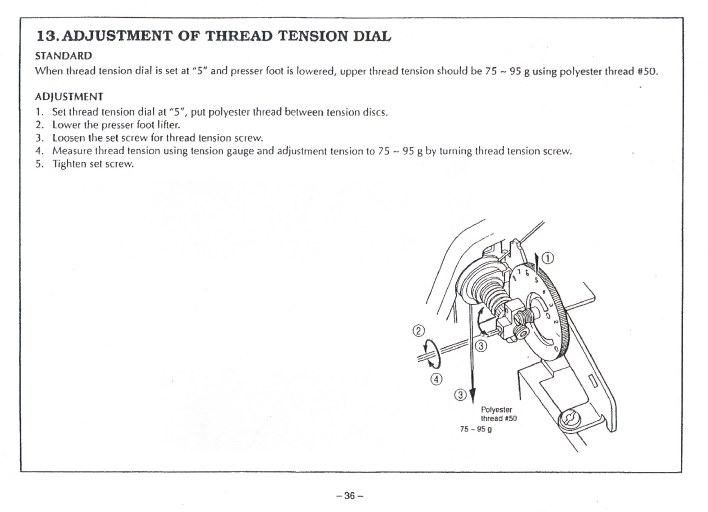
Bernina 830 Tension and Timing
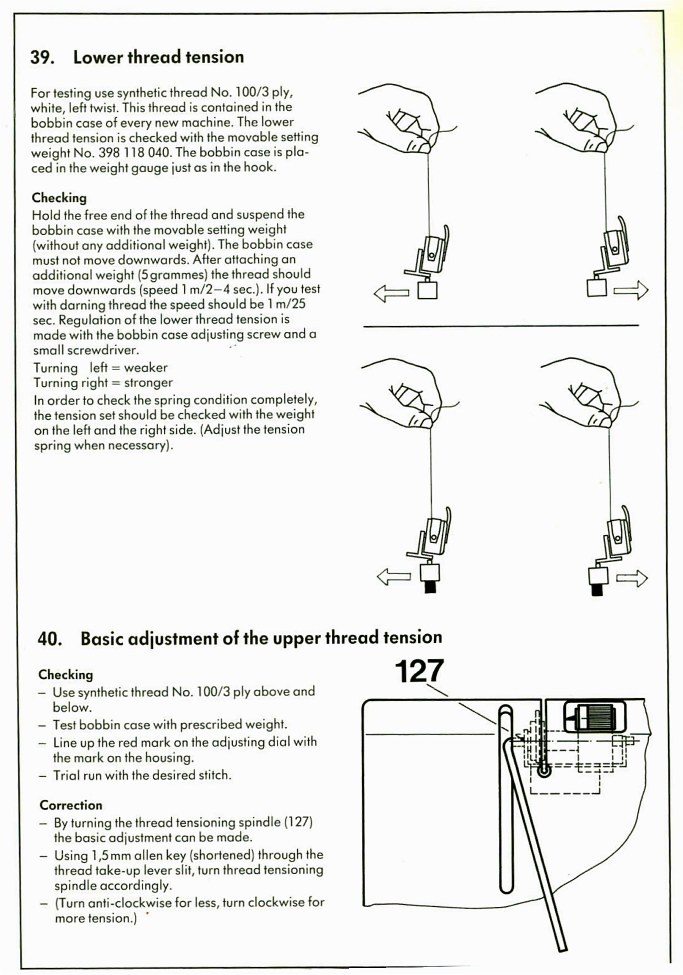
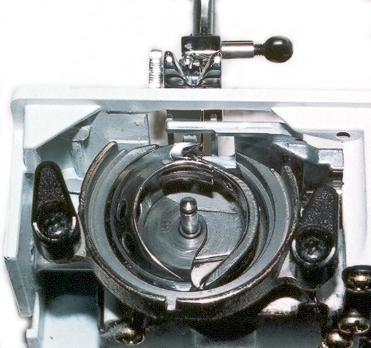
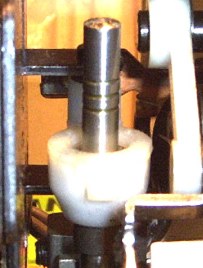
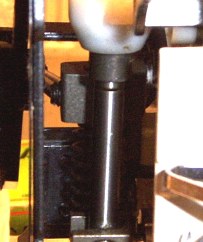
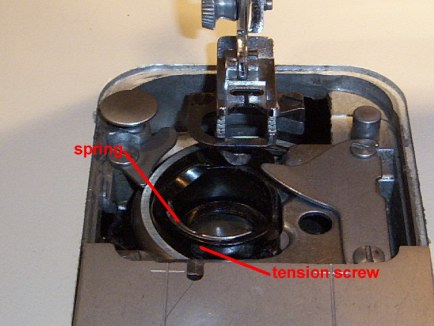
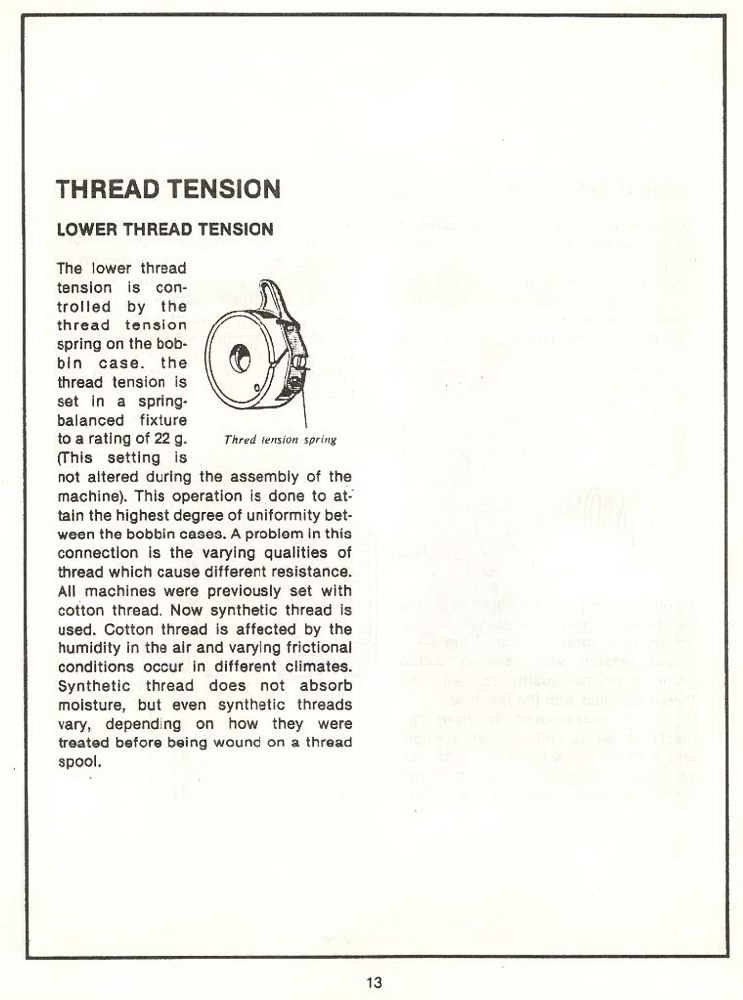
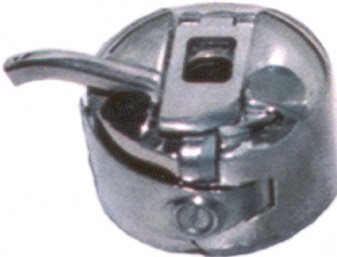
 To check the bobbin tension, insert a bobbin wound with medium weight thread into the bobbin case. Remove the hook from the machine. Snap the bobbin case onto the hook. Hold the hook and bobbin case by the bobbin thread and jerk the thread once or twice. The bobbin and hook should move down a bit. If the hook does not stop moving down the tension is too loose. If the hook does not move the tension is too tight.
If the tension is too tight, turn the screw counterclockwise ¼ turn at a time and retest. If the tension is too loose, turn the screw clockwise ¼ turn at a time and retest.
Continue to loosen or tighten the tension screw until the hook only moves down about ½” when you jerk the thread.
It is rare that you have to adjust your bobbin tension. Mainly if the tension spring was bent or for specialty sewing.
Top tension
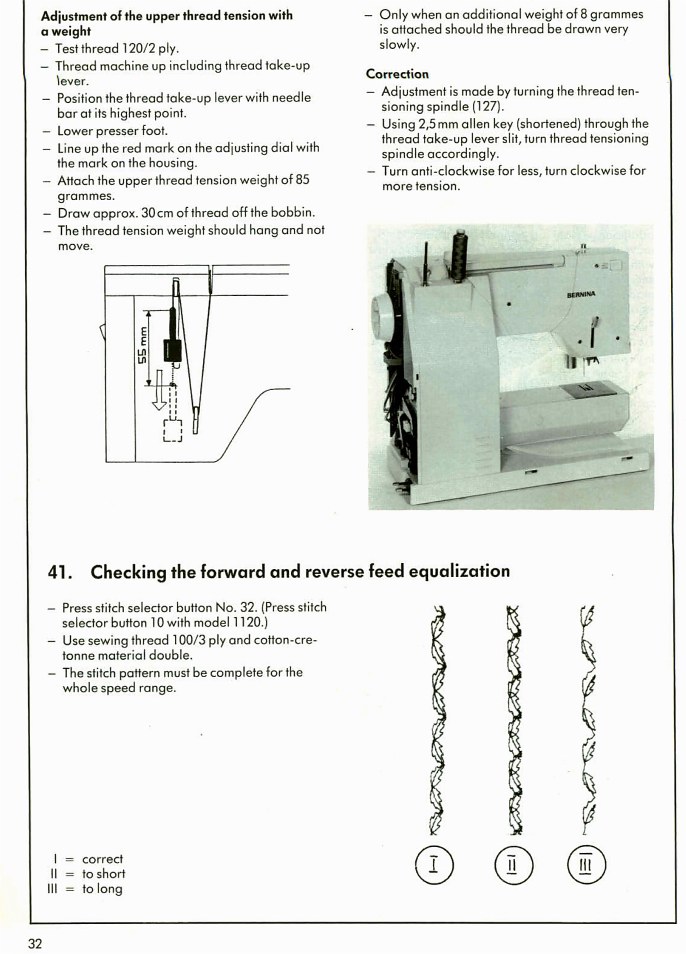
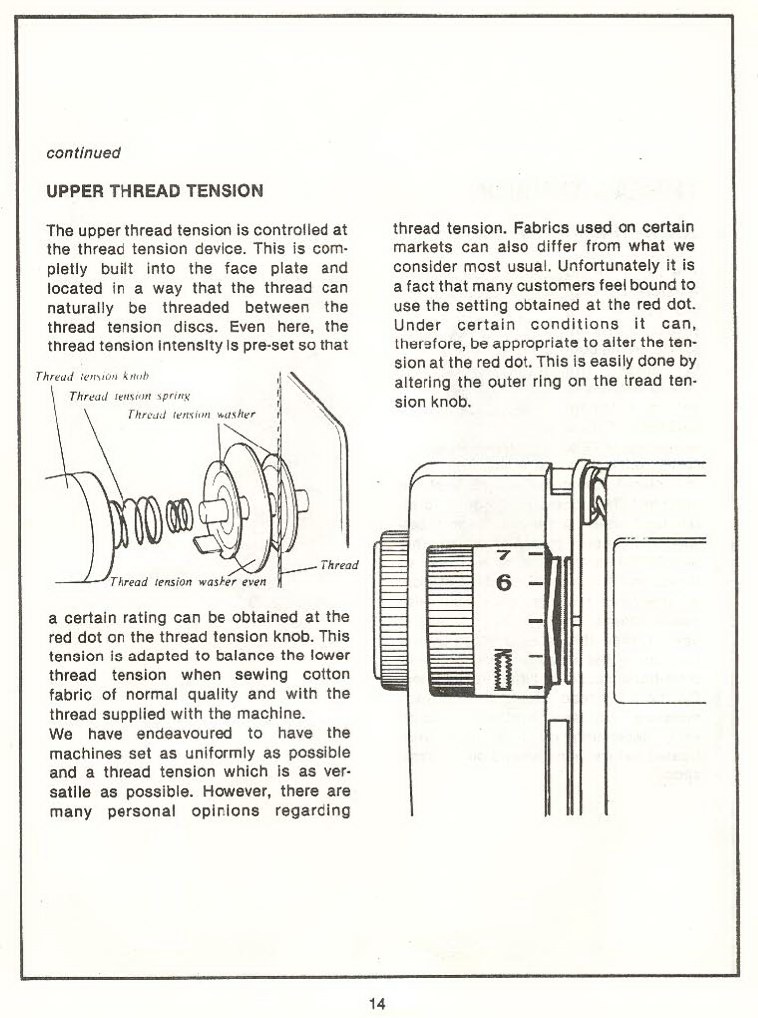
 The top tension is controlled with the tension dial. Normal tension is when the indicator is centered. After the bobbin tension is set the tensions should balance in the center of the fabric as shown.
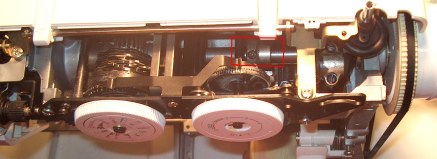
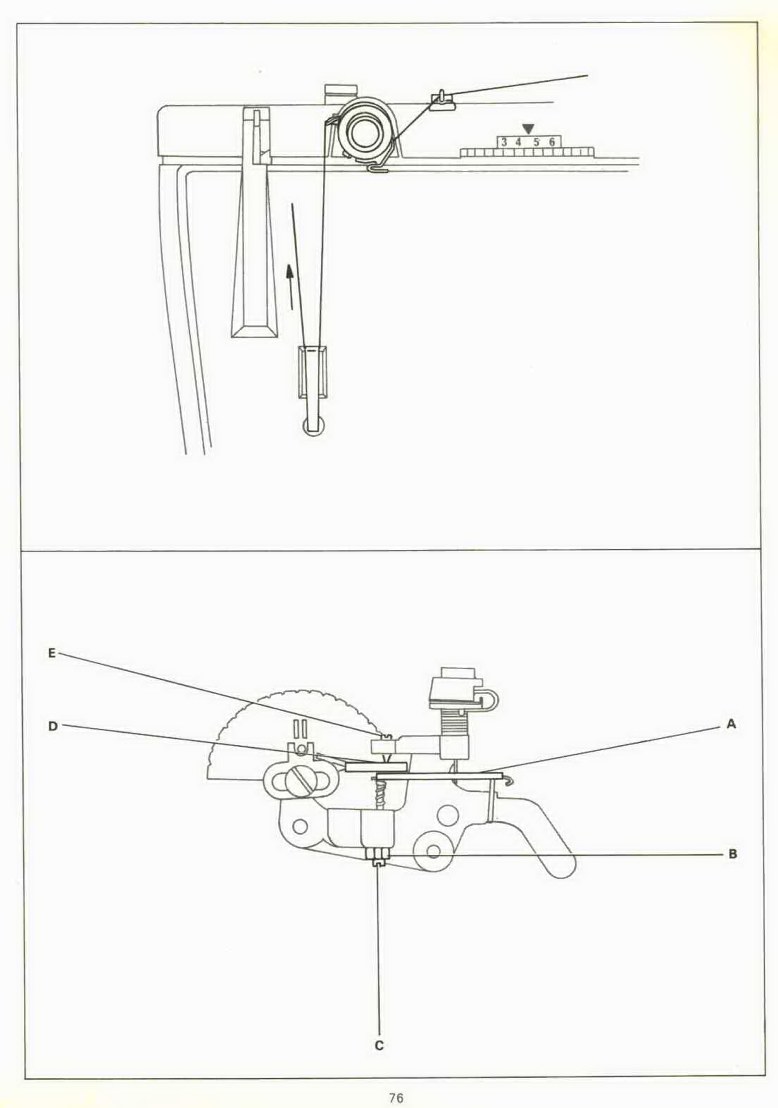
If adjustment is required, sew a test and turn the top tension dial until the right tension is achieved. Open the top cover and locate the adjusting screw. Loosen the screw and center the indicator. Tighten the screw and recheck the adjustment.
Your machine will sew on most fabrics without requiring tension adjustment. If you are using heavier thread or very thick fabric you may have to increase the tension.
The result you should look for in tension is for the knot to be formed in the center of the fabric.
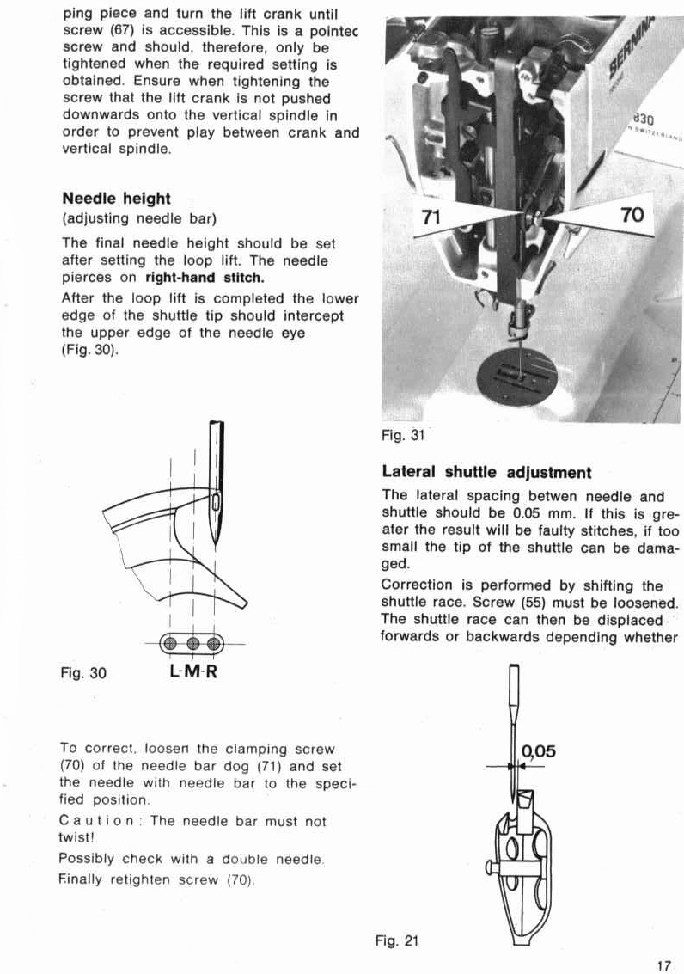
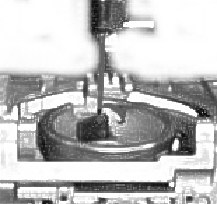
Bernina 830 hook timing
Bernina 1120 1130 1230 hook timing and tensions
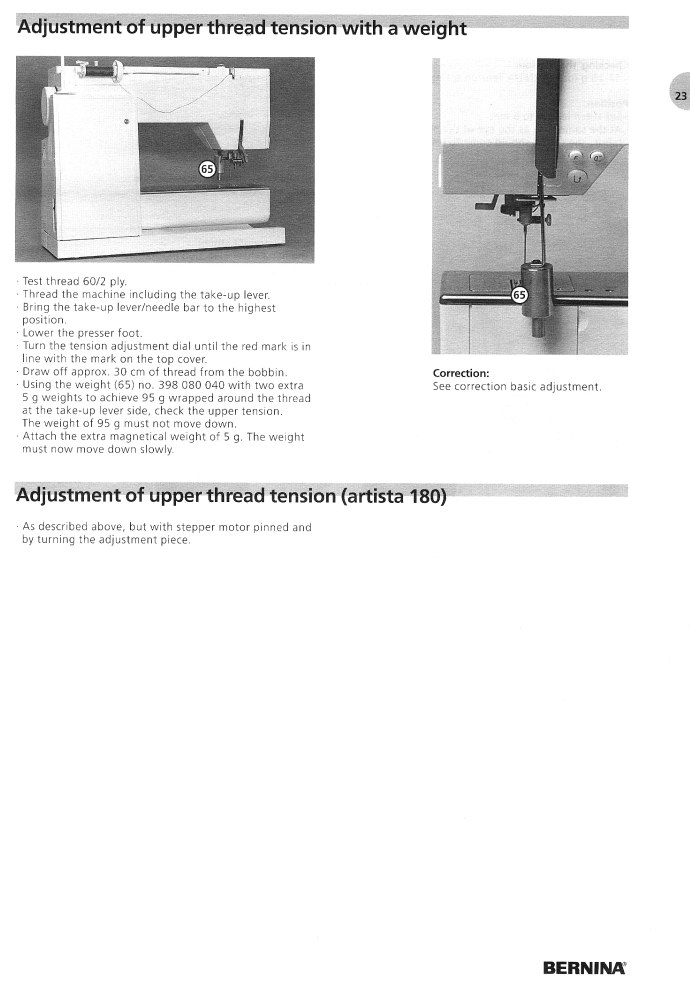
Tensions
Bernina 1120 1130 1230 hook timing
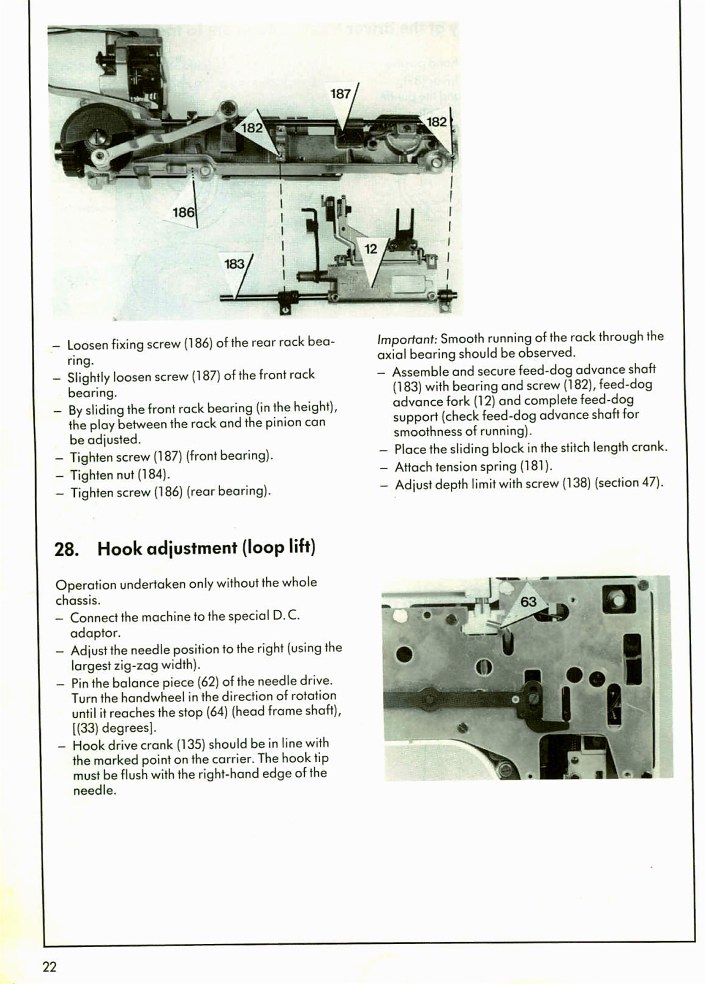
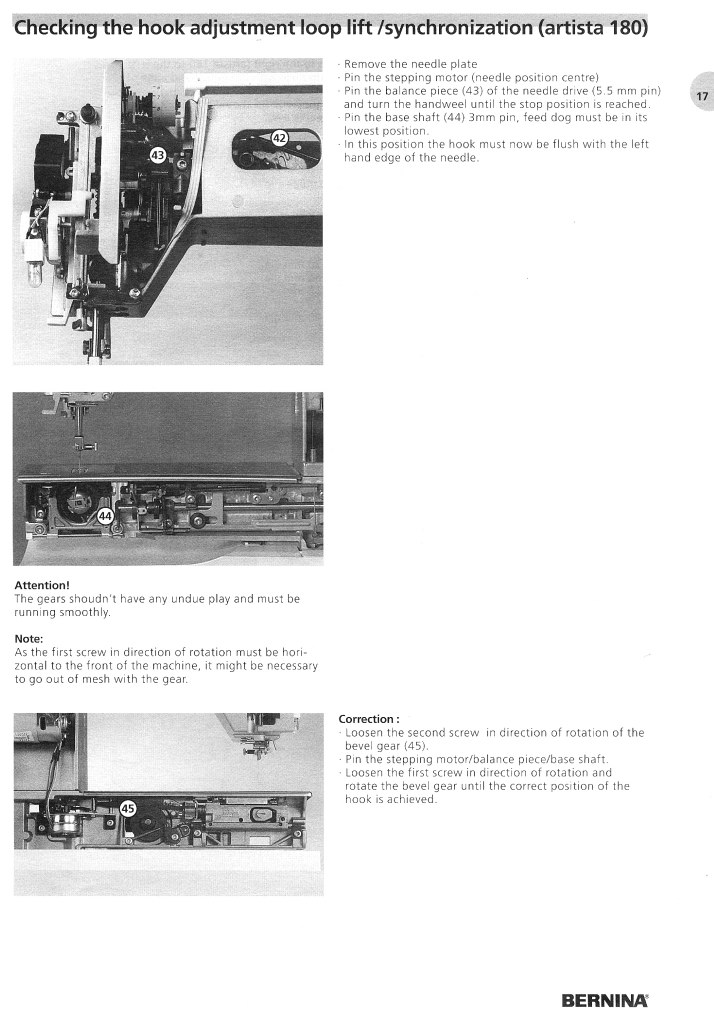
Bernina 170 180 tension and hook timing.
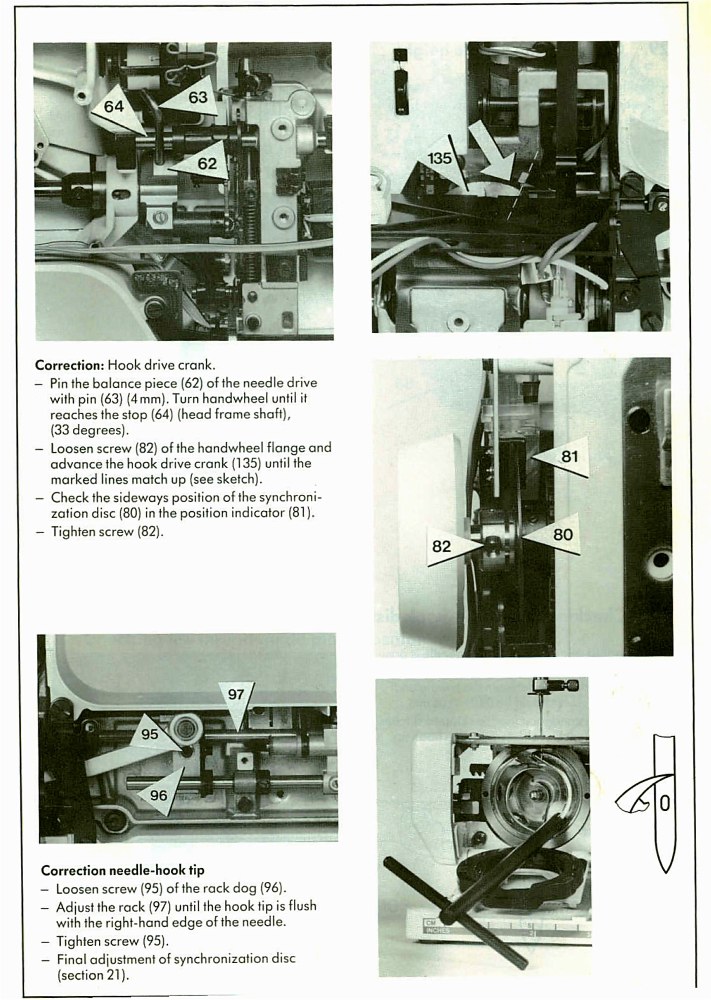
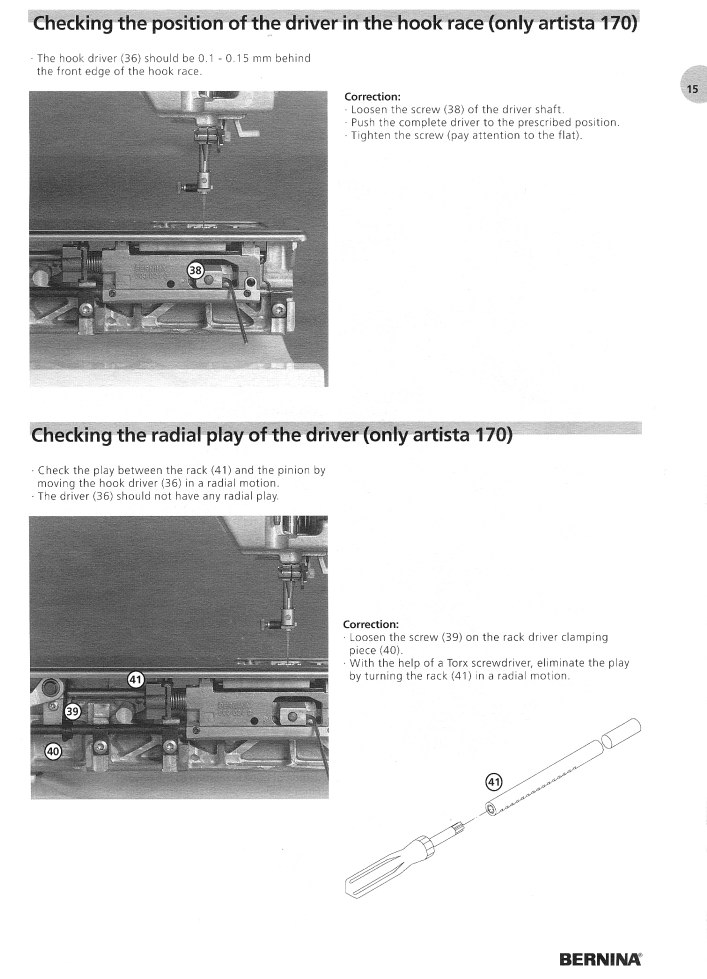
Bernina 170 180 hook timing.
Brother tensions and hook timing.
XL XR and PS machines
Husqvarna tensions and timing.
2000 6000 series sewing machine timing and tensions
Tensions
S2 drop in timing
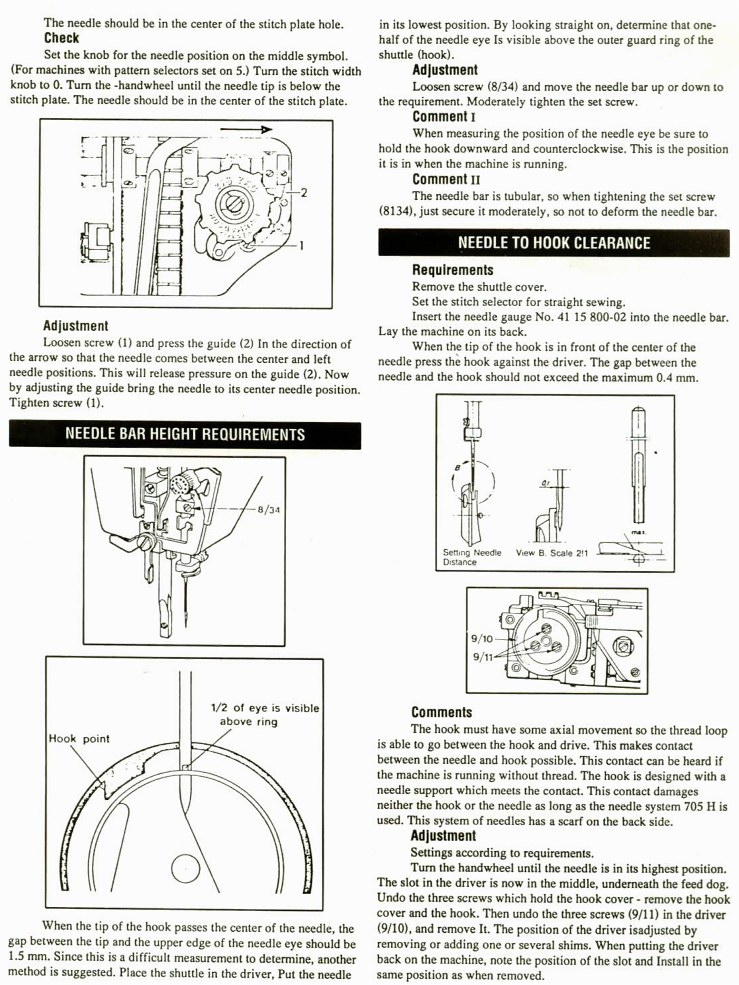
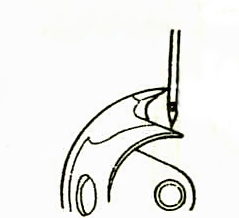
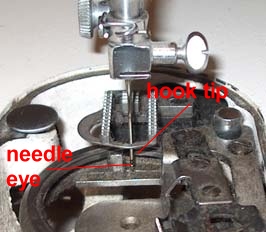
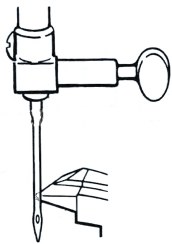
Insert a new needle into the machine. Turn the hand wheel towards you until the needle is at the lowest position. Gently push the needle bar to the left (not all the way but almost). Some models you set the machine to the left position.
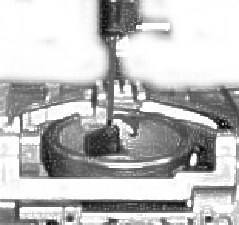
Slowly bring the needle up until the hook tip and needle meet. They should meet as shown below. The reason for this point is the thread is picked up by the hook from the scarf of the needle. If it picks up too high on the needle it will skip stitches on the right and if too low you will skip stitches on the left or center.
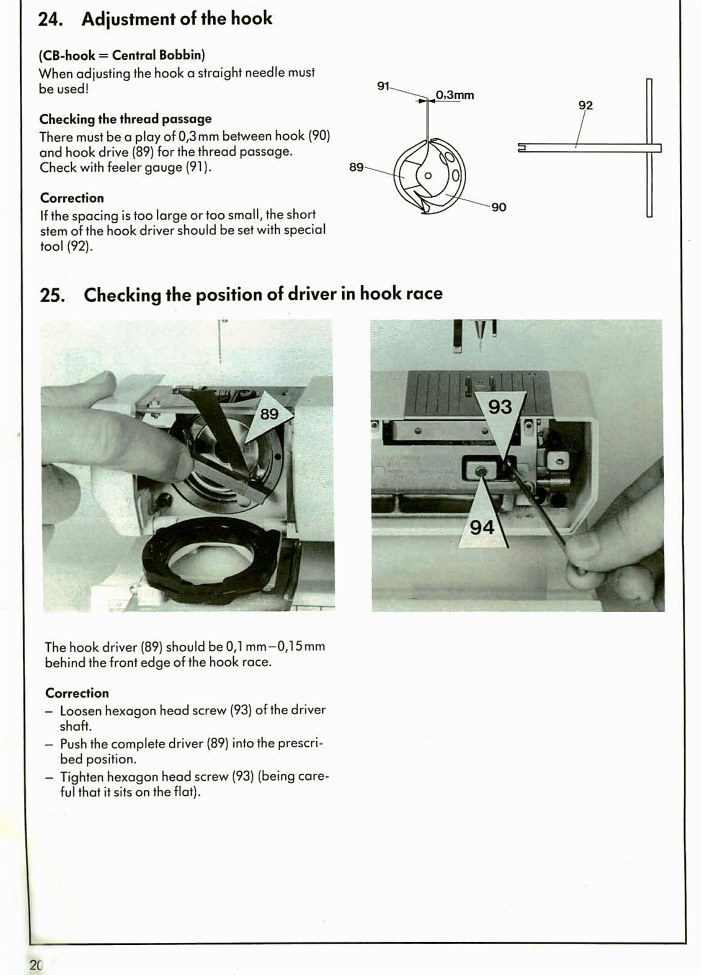
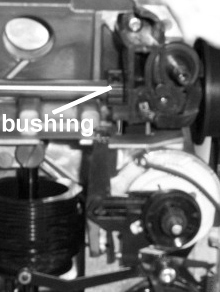
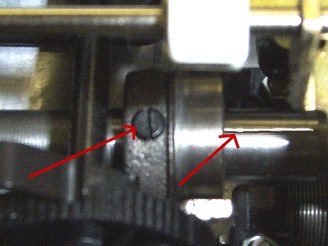
If timing adjustment is required, locate the timing adjustment bushing. Loosen the three screws on the bushing. The silver screw is a locking screw and has to be tightened last after the timing is done.
After the screws are loosened, carefully move the hook to match the picture below. Do not move the hook more than ½ turn as you may affect the feed timing. Tighten the screws starting with the two black screws. Recheck the timing.
Kenmore tensions and hook timing.
Timing older side load bobbin
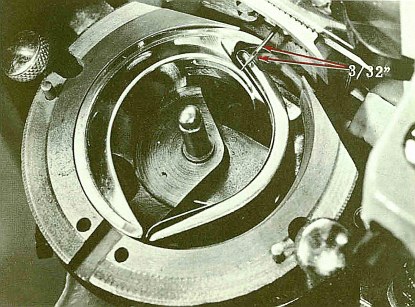
Insert a new needle into the machine (flat to the right). Bring the needle down to the bottom of its stroke by turning the hand wheel towards you. At the point when the needle is just starting back up, it should be positioned as shown.
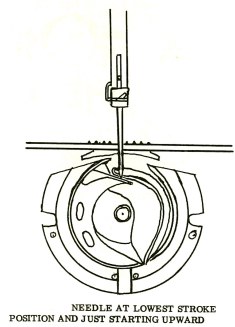
The second check will confirm if the timing is on. Bring the needle up until the hook tip and needle meet. You should have a distance of approximately 3/32 of an inch between the needle eye and the hook tip.
If the needle/hook timing is off locate the adjusting hole behind the needle bar area.
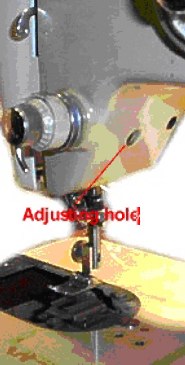
Insert a screw driver into the access hole and loosen the screw on the needle bar block (1/2 turn). Move the needle bar up or down to have the hook tip and needle bar meet as shown. Tighten the needle bar block screw. Be sure to not twist the needle bar when you move it up or down. Recheck the timing.
Timing 158 series
Insert a new needle into the machine. Turn the hand wheel towards you until it is in the lowest position. Set the machine to right needle position (or zigzag right side).
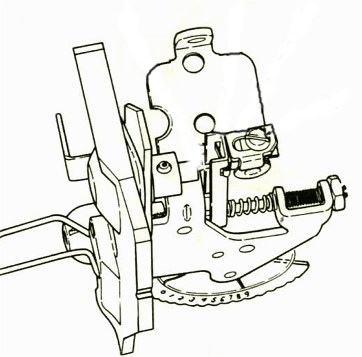
If the needle and hook do not meet as shown, the hook timing will have to be adjusted.
Loosen the screw as shown. Some models have a 5 sided nut which requires a special tool available through Sears. Carefully turn the hook until the needle and hook meet. Make sure the feed dogs are in the down position when the hook and needle meet. Tighten the screw and recheck the timing.
 Timing 385 source front load
Needle bar Height
Timing 385 source front load
Needle bar HeightSet the needle position to the far left position. Bring the needle to the lowest position. Slowly bring the needle up until the hook tip meets the needle as shown. The distance between the needle eye and the tip of the hook should be 2.9 – 3.5mm.
Hook timing
There are two ways to check the timing on your machine. In figure 1, set the machine on zigzag and bring the needle to its lowest point on the right hand zigzag. Bring the needle up to meet the hook. The hook should be just above the eye of the needle. In figure 2, set the machine to left needle position. From the lowest point bring the needle up to meet the hook. The needle bar should have moved up 1.45 – 1.95mm.
Adjusting Timing
Loosen the two screws on the hook drive shaft. Carefully move the hook to meet the needle as shown on previous page. Tighten the screws and recheck the timing.
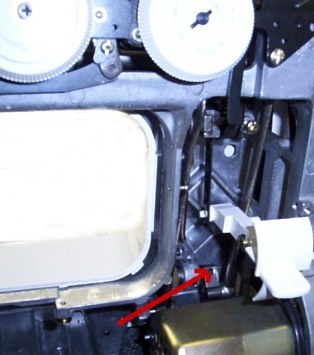
Feed Timing
To check the feed timing, line up the timing line on the main shaft with the screw on the feed eccentric. If they do not line up, loosen the screw on the eccentric and move the eccentric until they line up.
Timing 385 source drop-in
To check hook and feed timing start by inserting a new size 11 needle. Set the machine for left needle position. Turn the hand wheel to bring the needle down to the bottom of the stroke. Continue turning the hand wheel until the hook and needle meet as in fig. 1. The space between the hook tip and needle eye should be 1.6mm to 2.1mm.
If the hook and needle do not meet in the right position the timing will have to be adjusted.
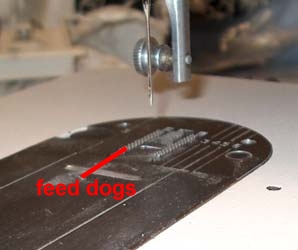
First check the feed timing. Replace the needle plate and bring the needle down to plate level. The feed dogs should also be level with the needle plate. Correct by loosening the two Allen key screws shown in fig 2. Adjust the needle bar to correct and retighten the screws.
Loosen the two Allen key screws ¼ turn, fig 3. Carefully turn the hook to meet the needle as in fig. 1. Tighten the screws and recheck the timing.
Some models do not have screws and you must loosen the timing belt tensioner and move the timing belt one cog at a time to set feed timing checking after each adjustment, fig. 4.
Fine-tune the hook timing as in fig. 3
Check the hook for damage on the tip and around the edge.
Polish with fine sand paper being careful not to over polish.
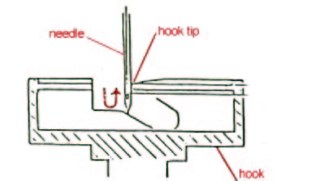
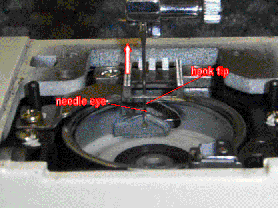
Fig. 1
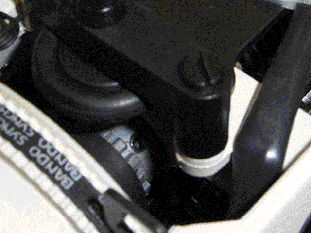
Fig. 2
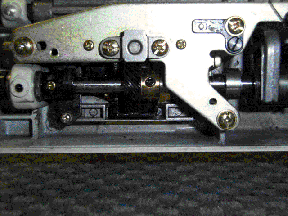
Fig. 3

Fig.4
Tensions 158 series
The bobbin tension on your machine should not be too tight. When pulling the thread from the bobbin case you should feel a good amount of tension but not enough so you have to pull hard. When adjusting move the screw ¼ turn at a time and recheck the tension.
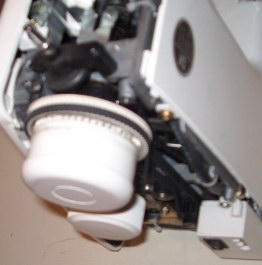
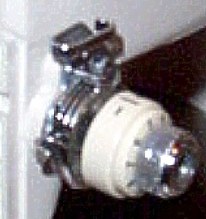
Remove the outer cap off the top tension unit by unscrewing the center screw.
Adjust the inner nut until the best tension is achieved.


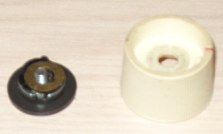
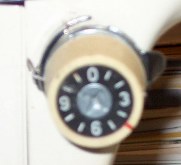
The parts inside the outer dial are shown in order. Replace them as shown then replace the outer dial onto the tension stud with the red line at 4.5. This will give you the best range of adjustment once the dial is back together.
The tension you are trying to get is for the knot to form in the center of the fabric.
Tensions 385 series
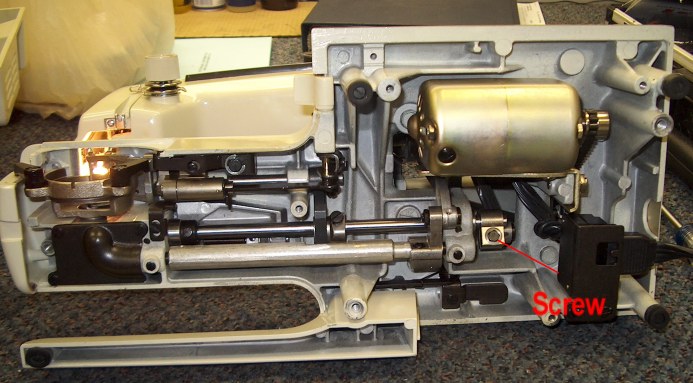
Insert a full bobbin into the bobbin case. When you pull the thread the tension should be 45 – 55g. It is very hard to measure grams of tension. You should feel some tension without having to pull too hard. If you hold the bobbin case by the thread and jerk it, the bobbin case should drop about ½ inch.

If the thread does not pull out easily, the tension is too tight. Turn the adjusting screw counterclockwise ¼ turn at a time until you get the desired tension.
If the thread pulls out quickly and you feel no tension, the tension is too loose. Turn the adjusting screw clockwise ¼ turn at a time to get the desired tension.
With the bobbin tension set, turn the top tension dial to a medium number. Stitch a test sample and check the results. The knot should meet in the center of the fabric.
If the tension is not as desired turn the adjusting nut up to increase and down to decrease the tension.
For heavier thread or fabric you may have to increase the top tension. For finer thread or fabric you may have to decrease the top tension.

Singer timing and tensions
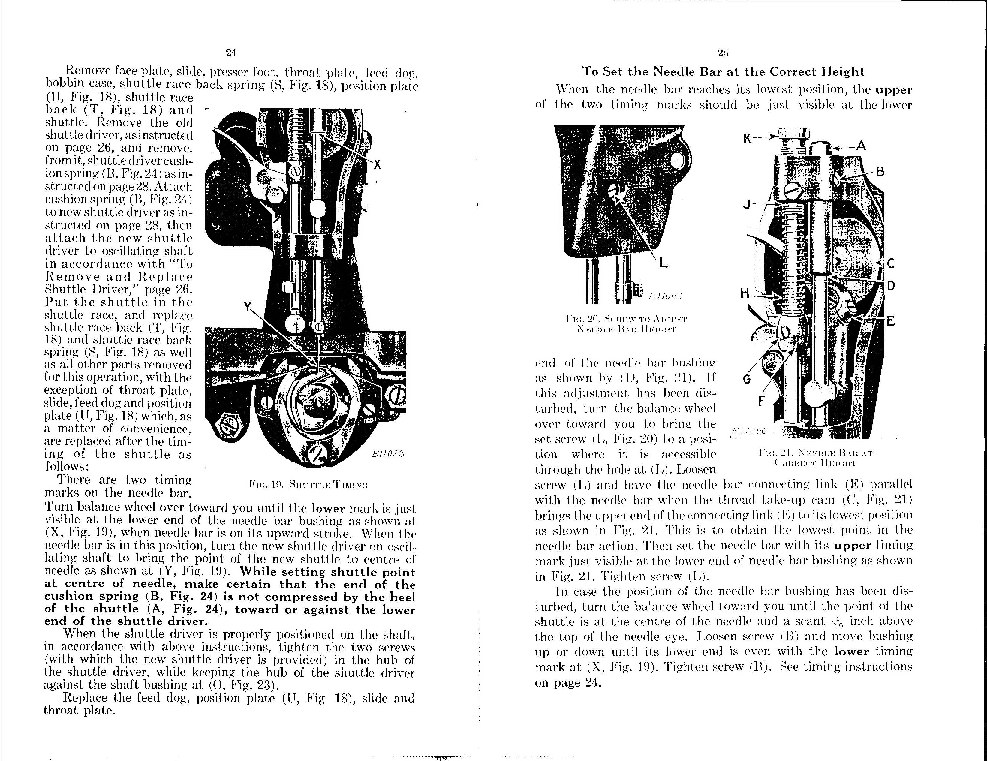
Timing needle bar height 15 class
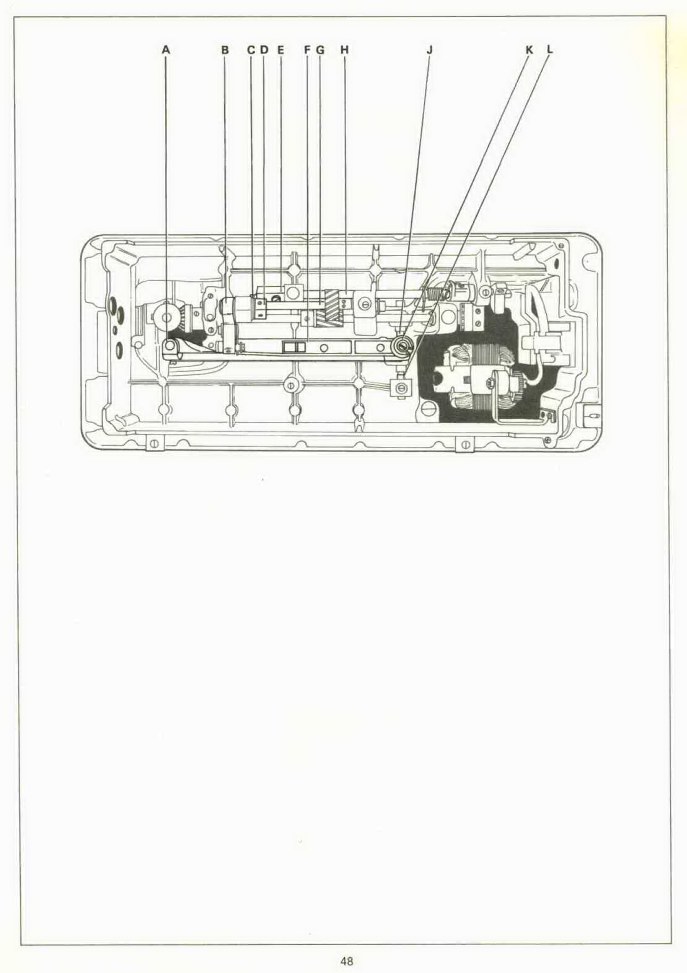
Timing 200 series (247, 252, 257)
Checking the timing on your machine is easy because there are timing marks that show you where the machine must be set.
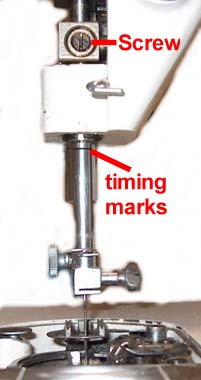
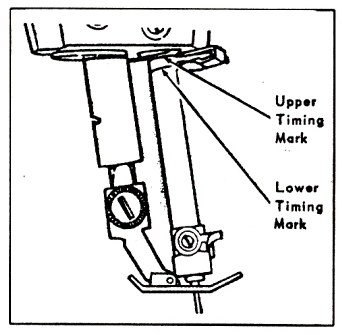
Remove the needle plate and bobbin case. Turn the hand wheel towards you until the needle bar is in the lowest position. You will see two marks on the needle bar with the top one being flush with the bottom of the bushing. If it is not loosen the needle bar screw and move it up or down to set the marks. Make sure you keep the needle bar straight (needle clamp screw should be straight to the right)
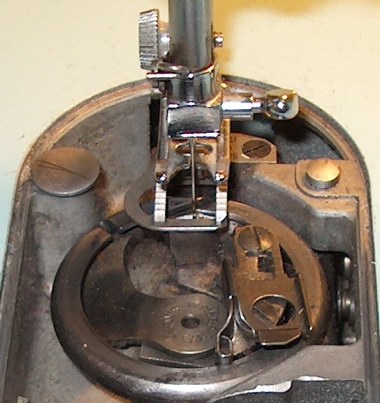
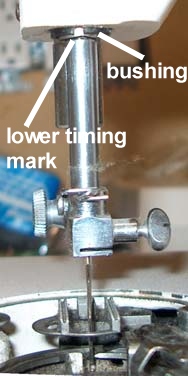
Next turn the hand wheel until the lower timing mark is flush with the bushing. At this point the hook tip should be just above the eye of the needle as shown.
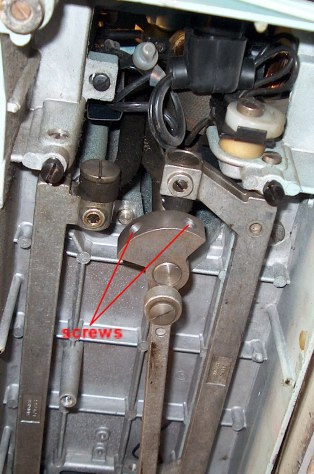
If the hook tip and needle do not line up as shown, turn the machine on its back making sure the needle bar does not move. Loosen the two timing screws on the hook pulley (only loosen them ¼ turn). Move the hook to line it up with the needle. Tighten the screws and recheck the timing. The feed dogs should be in the down position when timing the machine. If the feed dogs are up when the timing is set as shown, the hook timing is out 180°.
Timing 300 series (337 – 348)
Remove the needle plate and bobbin case. Turn the hand wheel towards you until the needle bar is in the lowest position. You will see two marks on the needle bar with the top one being flush with the bottom of the bushing. If it is not loosen the needle bar screw and move it up or down to set the marks. Make sure you keep the needle bar straight (needle clamp screw should be straight to the right)
Next turn the hand wheel until the lower timing mark is flush with the bushing. At this point the hook tip should be just above the eye of the needle as shown.
If the hook tip and needle do not line up as shown, turn the machine on its back making sure the needle bar does not move. Loosen the two timing screws on the hook pulley (only loosen them ¼ turn). Move the hook to line it up with the needle. Tighten the screws and recheck the timing.
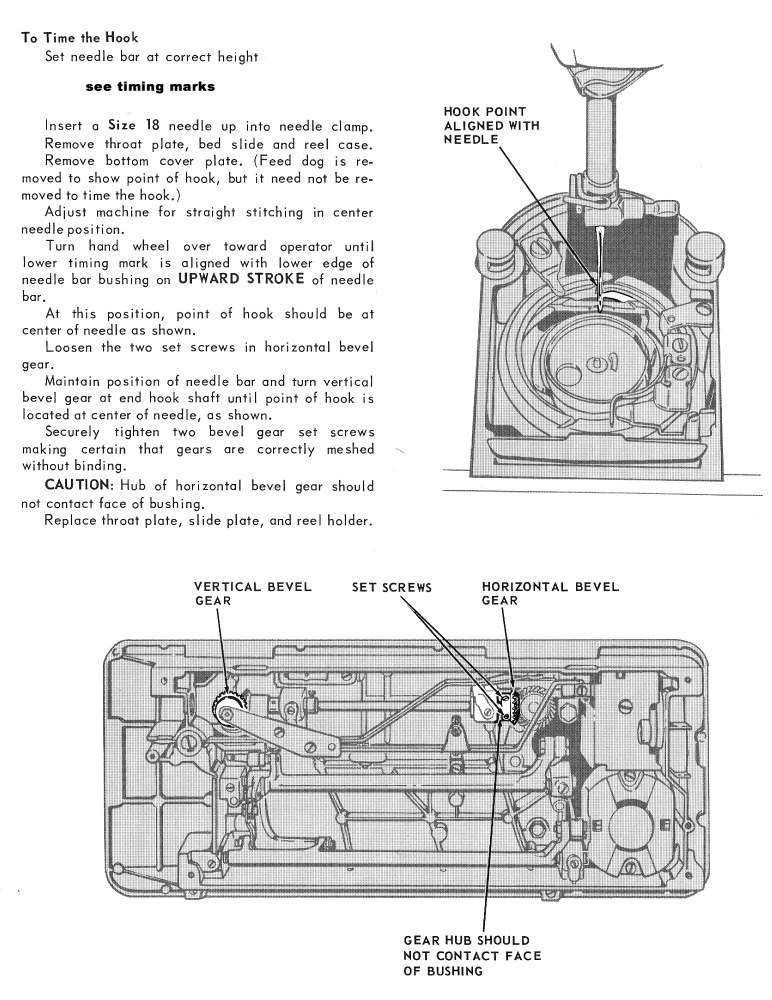
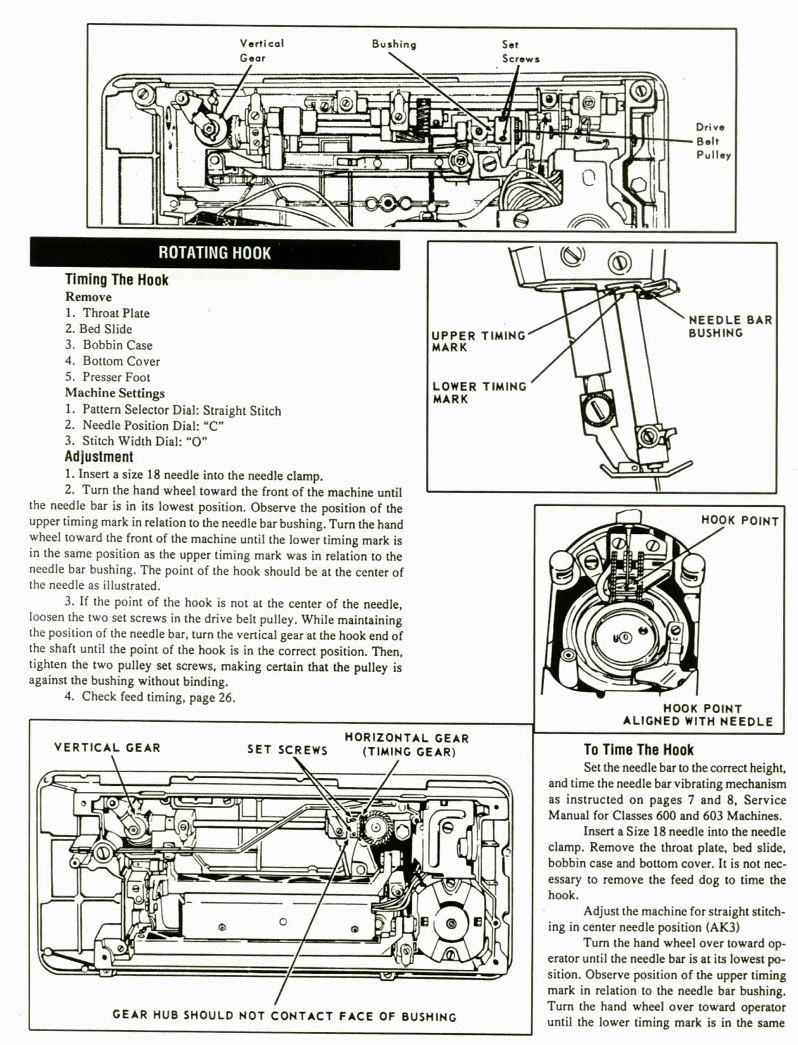
Timing 600 series
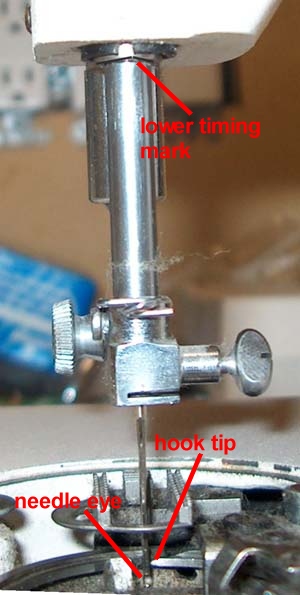
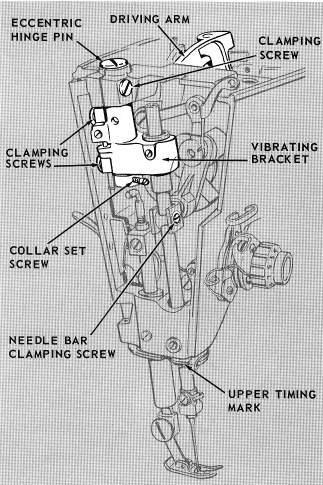
To check the hook timing first you need to check the needle bar height. Bring the needle bar to its lowest position. You will see two timing marks on the needle bar.
If the upper timing mark is just visible under the bushing as shown the needle bar is at the right height. If not loosen the needle bar clamping screw and carefully move the needle bar up or down. Do not twist the needle bar sideways.
Timing 700 series
Timing 500 800 series
Timing 6000 series (drop-in)
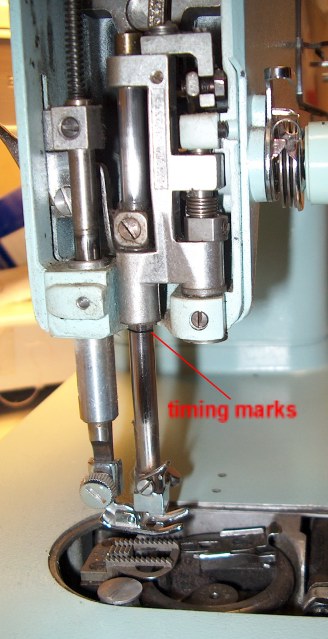
Locate the timing marks on the needle bar. Insert a new needle into the needle clamp. Set the needle position to the center. Bring the needle to the lowest position.
With the needle bar in the lowest position one timing make should be visible. Slowly raise the needle bar until the mark is level with the bushing. At this point the hook tip and needle should meet.
If the hook and needle do not meet as shown and the needle bar height is right as per the timing marks the timing will need to be adjusted.
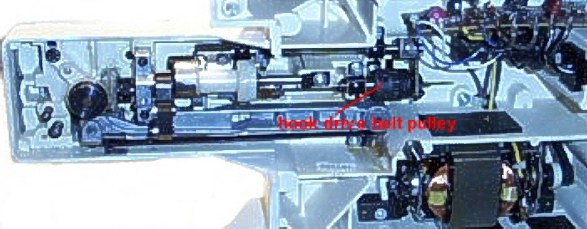
Turn the machine onto its back. Locate the hook drive shaft belt pulley. Loosen the two screws ½ turn each. Carefully turn the hook with your hand until the hook and needle meet.
Do not turn the hook too far and make sure the feed dogs are down when the needle is down. If the feed dogs are up when the needle is down the timing is 180° out. Re time the machine so the feed dogs are down when the needle is down.

Timing 6000 series (wind in place)
Insert a new needle into the needle clamp. Set the needle position to the left. Bring the needle to the lowest position. Slowly bring the needle bar up until the hook and needle meet. The hook tip should be just below the middle of the scarf of the needle.
The needle should have come up 2.4mm to 2.7mm from its lowest position.
If the hook and needle do not meet as shown you will have to adjust the hook timing.
Turn the machine onto its back. Locate the hook drive shaft belt pulley. Loosen the two screws ½ turn each. Carefully turn the hook with your hand until the hook and needle meet. Tighten the screws and recheck the timing.

When the hook and needle are in position the timing marks on the feed lifting cam should line up as shown.
If the two feed timing marks do not line up when the hook timing is set you will have to adjust the feed timing.
Locate the two screws on the feed drive gear. Loosen the screws ½ turn each. Carefully turn the feed lifting cam to line up the two marks. Tighten the screws and recheck the feed timing. Be careful not to turn the feed lifting cam too far. To check this make sure the feed dogs are below plate level when the needle is down. If they are up rotate the feed lifting cam 180° so the feed dogs are below the top of the needle plate.
Tensions 800 series
The bobbin tension should stay constant but may have to be adjusted if the spring was bent or thread was caught under the spring. Check under the spring for thread or lint. Insert a full bobbin wound with medium weight, light color thread. You should feel some tension but not enough so you have to grip the thread hard to pull it. If the tension is too loose or too tight turn the adjusting screw ¼ turn at a time to set the tension.
The result you are looking for is when the knot forms in the center on the fabric.
Tensions 500 series
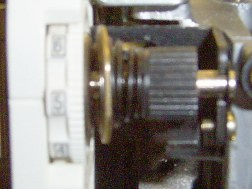
Loosen the screw on the top tension unit one turn. Remove the outer cover. Check between the tension discs for thread or lint.

Turn the adjusting nut ¼ turn at a time until the desired tension is achieved. Replace the cap at 4.5 and tighten the screw. This resets your top tension to a medium number.
The bobbin tension should stay constant but may have to be adjusted if the spring was bent or thread was caught under the spring. Check under the spring for thread or lint. Insert a full bobbin wound with medium weight, light color thread. You should feel some tension but not enough so you have to grip the thread hard to pull it. If the tension is too loose or too tight turn the adjusting screw ¼ turn at a time to set the tension.
The result you are looking for is when the knot forms in the center on the fabric.
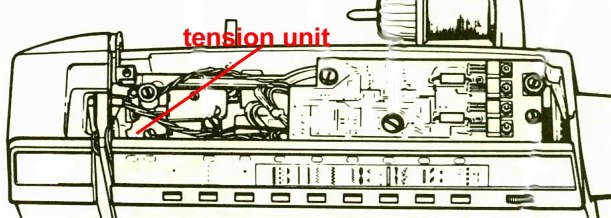
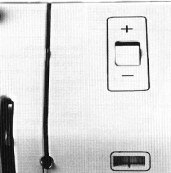
Tensions 2000 series
From the open top of the machine, locate the top tension unit. The normal top tension for your machine should be 3 – 4 on the tension dial. The bobbin tension should not require adjusting. Stitch out a test seam. The knot should meet in the center of the fabric.
If adjustment is required, loosen the nut on the tension unit and turn the adjusting screw ½ turn at a time and test stitch again. Continue until the right tension is achieved. Make sure the dial is set at normal after you turn the screw and before you test stitch.
Turning the adjusting screw clockwise will tighten the top tension (increase). Re tighten the nut and replace the covers on the machine.